Why do pipers use sticky tape on their pipe chanter?
by Ian Lyons
The simple answer is to tune each individual note.
The bagpipe chanter has no mechanism to tune individual notes, therefore sticky tape is used on each hole to either flatten or sharpen the note.
Why sticky tape?
For many decades, adhesive tapes have been used as the most convenient, reliable and non-invasive way to make minor alteraltions to the pitch of a note on the bagpipe chanter. The sticky tapes that are most commonly used by pipers have been sourced by bagpipe manufacturers, suppliers and retailers. These tapes are usually cut to a specific width and are usually very thin so you hardly notice that it's there. The most important feature of the tape is that it can be taken on and off the chanter several times without losing its stickiness and can withstand sweaty, warm hands for an amount of time before it needs to be replaced.
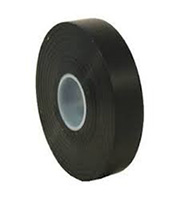
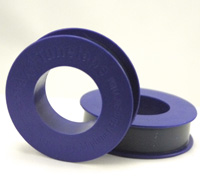
Below are two examples of sticky tapes used on the pipe chanter. One is a matt-black adhesive tape and the other is a specially designed clear chanter tape. Both are cut to a specific width to suit use on the bagpipe chanter.
Why use tape?
The use of tape on bagpipe chanters has been one of the most weirdly debated subjects in the history of bagpipe tuning. The facts and logical sense behind the use of tape on bagpipe chanters is so overwhelmingly proven but its almost like a heavily guarded secret amongst pipers, pipe majors and pipe bands. Still to this day, pipers and pipe majors hide away from the fact that tape is being used to tune their chanters. The topic still isn't covered extensively in any bagpipe tutor books in order to give pipers the knowledge of how to tune the instrument that they have painstakingly spent years learning how to play. It's akin to a guitar teacher taking the tuning pegs off a guitar and saying "here you go, struggle with that until you can play it properly, then I'll show you how to tune it!"
Another unfortunate fact is that many bagpipe teachers haven't taken the time to learn and understand how to use tape themselves. Mainly because they came from an era when it was almost frowned upon. Years ago, many chanter manufacturers and reed makers advertised that their chanters and reeds where matched so therefore didn't require the use of tape. So, therefore it hasn't been passed on as an integral part of learning how to tune our wonderful instrument properly and accurately. This isn't to say that many of these pipers were able to get their bagpipes well in tune without using tape, but the level of accuracy wasn't anywhere near what is required today.
Well, I'm going to explain the reasons for using tape and give you a method to use to learn how to set up your pipe chanter efficiently and accurately.
The ideal goal is to have the ability to tune every single note on your bagpipes. The 9 primary notes on the pipe chanter and the 3 notes of the drones. So, 12 notes in total!
The drone notes are very easily adjusted by just moving the upper drone sections up or down on their slide. Therefore, the chanter notes should be easily adjusted by moving something up or down over the hole and the best option, to date, is tape. Hypothetically, imagine bagpipe drones were solid without the slides. How would we tune the drones? Well you could continually take each drone out and adjust the drone reed every time you need to change the pitch slightly, but that would be very tiresome and inaccurate. OR, you could use a piece of sticky tape over the hole at the top of the drone to either close the hole over or open it up to change the pitch. Luckily, we have the slides though!
Using tape on the holes of the chanter is a completely logical solution until such times as technogoly presents us with a fully adjustable/tunable pipe chanter.
The argument for or against using tape is void! The simple fact is, if you want your pipes to be reliably in tune with the option of tuning any note at any time, you'll need to use tape.
The facts
Unlike most other musical instruments, one of the biggest challenges in learning to play the bagpipes is learning how to tune them. It's not easy to start with, but with time and practice it's very achievable.
The bagpipes have a chanter, three drones, single and double bladed reeds, they have to be played at a steady pressure using a bag to allow pipers to produce a continuous sound and they are continually affected by moisture and internal and external temperature. The combinations and variables involved are almost infinite.
The bagpipes have drones, which when in tune together, create harmonized notes that should also be in tune with every note on the pipe chanter. Lots of other musical intruments don't have a continuous sound compenent, like drones, that play against the backdrop of the instruments music making component, the chanter. When pipers tune their drones to the tonic note of the bagpipe scale, Low-A, they are attempting to create harmonization between the drones and the pipe chanter. The bagpipe scale should be tuned so that every note in the scale harmonizes with the drones as well, to create an overall instrument that is in tune and balanced. This also ensures that all the notes on the bagpipe scale are tuned to the correct intervals as well.
A single drone produces a note. Each of the three drones on the bagpipes is able to be tuned by sliding the drone up or down to either flatten or sharpen that note. It's as important, if not more important, to have this ability to tune each and every note on the pipe chanter too. After all, this is the component of the bagpipes that produces the music that we play. So, it's actually more important that these notes are in tune than the drones. But we want everything to be in tune! Many pipers are almost obsessed with having their drones perfectly in tune but a lot less obsessed with having their pipe chanter perfectly in tune.
You should always strive to have all the notes on your bagpipes perfectly in tune!
Why can't I get my pipes perfectly in tune without using tape?
With an extreme amount of experience and copious amounts of luck and good fortune, access to limitless chanter reeds and a perfectly created and balanced pipe chanter which those reeds are specificallymade for, you could get your pipe chanter very close to being in tune!
Unfortunately, with the bagpipes, the less experience you have, the harder this is to achieve!
You must remember that pipe chanter reeds are made from cane. Every single piece of cane on every single reed, ever made, is different.The way they are put together and tied together is different and the way they sound and vibrate and are affected by their environment is different. Every single pipe chanter, ever made, is different and the combination and variables in the environment in which the reed and chanter come together and are played is different. The consistency in the production of these products in the last 30 years has become very good but you still have to deal with these variables when setting up and tuning your instrument.
The importance of fresh tape
The most important thing about using tape is to always make sure that you have fresh tape on your chanter. After a few plays, especially if you have sweaty hands, most sticky tapes loose stickiness. Also, if the tape is constantly adjusted, it can loose its stickiness and also leave a residue on the chanter. Get in the habit of continually changing old pieces of tape and wiping any residue off your chanter to ensure that the next new piece sticks well. Old pieces of tape will let you down when it is needed most. Performance and adrenaline can make you sweat and your hands to heat up more. A piece of tape slipping over, or off, a hole can have catastrophic and potentially embarassing onsequences.
So, how do I effectively use tape?
Ideally you want to have the ability to make an alteration to any note at any time. Start by putting a piece of tape just above every hole on your chanter including the two sound holes on the bottom of the pipe chanter so your Low-G can also be tuned. Make sure the tape goes the whole way around the chanter and overlaps too.
A secure way of applying tape is to start at the back and wrap the tape around the chanter twice and cut it off at the back. Use the first time around for the adjustment and the second time around to secure the tape. So, it's only the first time around that actually covers the hole in any way. The second time around is just to make sure the tape doesn't move. Every time you need to make an adjustment you have to undo the second layer, then carefully make the adustment on the first layer and then re-apply. If you just use one layer, then the tape can easily start slipping once it wears and warms up, or gets affected by sweaty hands.
When starting off, just place the tape above the holes so they aren't covering any part of the hole at all as yet.
Tuning a pipe chanter using tape
To flatten a note you cover the hole partially with tape and to sharpen the note you remove some tape partially off the hole. Always make adjustments in very small increments.
When making adjustments, don't take the tape right off the hole and then try to guess where it was before. Carefully move the tape up or down without loosing your reference point.
If you're happy with the pipe chanter reed you've chosen to play, then set it at the pitch that you want to play at. The pitch range and balance will be determined by the brand, type and era of pipe chanter that you have.
But how do I know if the note is in tune?
If you listen very carefully to the note you are playing against the note of one drone or more drones, you should hear the two notes harmonizing if they are in tune. This may take time to develop an ear for but most people can recognize sounds harmonizing with each other. For pipers, a simple way to practice hearing this is to try to tune only two tenor drones together. You'll hear a slight beating sound within the drone sound that slows down as the two sounds come closer to being in tune together that finally flatlines into one sound when they reach being perfectly in-tune.
This is initially more difficult to pin-point in two different sounds i.e. the chanter sound against a drone sound, but with practice you'll learn to recognize it.
The pressure test!
Before you go any further there is an important test that you will need to learn how to use. This is called the pressure test and is simply the use of a very very subtle change in pressure to allow you to determine the pitch of a note or how in-tune it is.
If you have decided that a note is out of tune then you can perform a simple pressure test to see how far out of tune it actually is. This has to be very very subtle to acheve the desired result! Go to the note and very very carefully alter your playing pressure to change its pitch. You can do this be easing off your playing pressure very slightly or increasing your playing pressure very slightly.. You will hear the note come into tune with the drone. If you have eased off your playing pressure to get the note to come into tune then that means the note is sharp and you need to adjust the tape further over the hole to correct it. If you have increased your playing pressure to get the note to come into tune then that means the note is flat and and you have to take tape off the hole to correct it.
Only stay on the note for 2 or 3 seconds! Immediately you hear the note, simply answer this question in your mind:-
Is the note in-tune or out-of-tune?
If you decide its in-tune you don't have to do anything!
If you decide it's out-of-tune, you "must" do something. Do the pressure test and then stop and adjust the tape!
Use the pressure test to determine whether the note is flat or sharp to the drone. Remember, only stay on the note for 2 or 3 seconds! The speed of your decision is paramount to getting the notes accurately in tune and creating the correct intervals between all the notes in the scale.
Never use the pressure test before you are first certain that your Low-A and the drone are perfectly in-tune with each other.
So, remember to use the pressure test as you go through the process of tuning your chanter.
Balancing the reed in the chanter
Start by adjusting the tape above your Low-A note about 1mm - 2mm over the Low-A hole.
If you are striving for an exact pitch, for example 482 on a bagpipe tuning meter, then you need adjust the reed to set Low-A at that pitch.
The first thing you need to do is make sure that Low-A & High-A are balanced. This means that they are both in tune and at the correct interval. Both these notes form the octave in which bagpipes are primarily played, consisting the tonic note and the top note of the main bagpipe octave.
Stop your bass drone and one tenor drone and tune the other tenor drone accurately to Low-A. Play your pipes at your regular playing pressure. If your just a beginner in this process, stick a medium rubber bung in the top of the bass drone and one of the tenor drones so you don't have to struggle to stop them every time you make a tape adjustment. You can also take an accurate reading with a bagpipe tuner to get a second reference and also give you a visual number. Then simply test the octave by going from Low-A to High-A. Do this repeatedly, several times, to get a good sense for how accurately it is set.
Once you get to High-A decide if it's in-tune or out-of-tune. If it's out-of-tune then use the pressure test! If the High-A is sharp then adjust the tape to cover the High-A hole a little bit. If the pipe chanter and reed are well balanced then there should be an equivalent amount of tape on both the Low-A hole and the High-A hole.
Spend plenty of time getting this as accurate as you can!
There may be a bit of playing around in this stage because ideally you want to have some tape on Low-A and on High-A and the chanter to be at the desired pitch. If this all isn't working out, then you may need to consider the suitability of the reed or even the pipe chanter. (older era pipe chanters or reeds that are too weak or too strong for you can make this balancing process very difficult) For example; the chanter might be set at pitch with only a small amount of tape on Low-A, but the High-A hole might be over half covered with tape to get the octave balanced. This is where you may have to consider a different reed or the chanter may be too old.
If you're a beginner, this whole process can seem impossible to start with! As you get more atuned to listening and using the pressure test and adjusting tape, you'll be come more confident.
Tuning the rest of the notes
Once you have the Low-A and High-A both balanced to the octave and each of the two notes has a small covering of tape over the hole and it's at the pitch you want, then you are pretty much ready to set the rest of the notes. Setting the rest of the notes is the easier part of this whole process.
Re-tune the drone accurately to Low-A. Then one-by-one go up the scale testing each note, starting with B.
Try this method.......Go from Low-A to B two or three times using a gracenote, doubling or grip.
Remember to instantly make the decision about the note being in-tune or out-of-tune and then, based on that decision, decide to use the Pressure Test or not!
To flatten a note, cover the hole with tape and to sharpen a note, take some tape off the hole. Make adjustments in very small increments until you are satisfied that the note is in tune.
Check and cross-check your adjustments several times and listen carefully to the note intervals. Apart from the pressure test, never ever adjust your playing pressure.
The reason for trying to ascertain the accuracy of the note so fast is because as pipers we instinctively adjust our playing pressure to make the notes come into tune. As musicians, we want to play in tune, therefore it's only natural to make those adjustments to suit. But remember, you are playing an instrument that requires constant, steady pressure. pushing-out or easing-off on a particular note may be easy to do in a very slow tune, but doing this in even the simplest of marches is impossible. Plus, why would you want to do this at all if a little piece of sticky tape can correct the note for you.
Repeat this process for every note on the scale. Continually check the accuarcy of the drone to your Low-A.
Notes like D, F and High-G will be difficult to tune as a beginner, but the more you do it the easier it becomes.
Once you've completed the whole process then start your other drones and tune them all together.
You don't have to strictly go through this whole process every time you play your pipes. Although it's a great learning process if you're a beginner. A guitar player tunes every string on their guitar every time they pick it up! Once you've set up your chanter then you'll only have to make minor adjustments on some notes that require fine tuning.
Don't forget to tune Low-G. Many pipers forget to tune this note. It is tuned in exactly the same way as all the other notes except you are adjusting the tape over the two sounds holes on your chanter similtaneously.
Too much covering of tape
Generally speaking, if you have a note over half covered with tape then you will be affecting the quality of sound coming from the note, even if it is perfectly in-tune.
If you have completed the whole process only to find that the holes have too much tape covering, then you'll need to assess this. Look at the spread of covering of the notes on the whole chanter and if there is a consistent over-covering of tape then you'll need to adjust the reed and reset all the notes. Lift the chanter reed slightly up in the reed seat, adjust and balance the octave Low-A to High-A and then rest the reset of the notes.
If you find that you have set the whole chanter but there are one or two notes without any tape over the hole, then you may also need to adjust the reed. Sink the reed down very slightly in the reed seat, adjust and balance the octave Low-A to High-A and then reset the rest of the notes.
Remember, ideally you want a small covering of tape over every hole to allow you to adjudst any note at any time.
Replacing a worn piece of tape?
Ideally you don't want to loose your reference point if the note is perfectly in tune and you've spent precious time tuning!
Firstly, cut a small piece of tape to use as a marker to mark the position of your current piece of tape. Don't just rip off the current piece of tape off as you'll loose the position. Place the marker piece of tape below the current piece of tape accurately, then you can remove the current piece. Wipe any sticky residue off the chanter and then replace with a new piece.
Try to not let your tape get too old as this is when it leaves residue and becomes harder to clean the chanter. Replacing tape on a regular basis keeps it fresh and clean and functional.
Maybe once every 12 months you should remove all the tape from the chanter and give it a really good clean and replace the tape.
Don't be afraid to tune your bagpipes.
Don't be a fraid to move your tape if you identify that a note is out of tune. It's simply moving a piece of sticky tape that can be moved back.
Don't stand and suffer through your practice sessions with out-of-tune notes on your pipes.
Don't let anyone tell you that using tape is a bad thing!
And, always remember that out-of-tune bagpipes sound awful!
Any Questions:- sales@lyonsbagpipes.com
Website Created and Managed by Lyons Bagpipes & Highland Supplies©